Date: 14th of March 2013
Participating group members: Thomas Winding, Kenneth Baagøe and Morten Djernæs Bech.
Activity duration: x hours
Overall goal
To build various Braitenberg vehicles, using Lego NXT, and observe what behaviours they exhibit when e.g. exitatory and inhibitory connections are used.
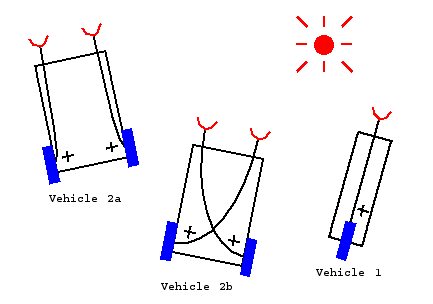
Figure 1
Overall plan
To achieve the goal mentioned above, we will be drawing inspiration from the lesson description and Tom Deans notes[1][2]
Braitenberg vehicle 1
Goal
To make vehicle 1 as pictured in Figure 1.
Plan
As a sensor for the Braitenberg vehicle we will be using a sound sensor. First we will try mapping the values measured to a power between 0 and 100. Afterwards we will try mapping the values to a power between -100 and 100. Lastly we will try mapping the power an inhibitory connection instead of the exitatory we will be using to the two first experiments mentioned.
Results
First experiment: Using raw values from the sensor we map to power in a simple way: Since the sensor measures values between 0-1023 we divide the value by 10 to get an approximate value between 0-100 and round down/up in case the value should be outside the 0-100 range (in this case the values could only happen to be over 100 though since the lowest measure is 0). Using these values we get a robot that moves forward when it registers some sound. This sound has to be of some volume though, since the motors do not run unless they get a power of somewhere around 50-60 or above.
Second experiment: We use the same procedure as above except to get the motor power we do the following calculation on the sensor value: (soundValue/5)-100 to get values in the range [-100, 100]. The resulting behaviour in the robot is that it moves forward when it registers sound and backwards when it doesn’t
Inhibitory connection: We achieve the inhibitory connection simply by inverting the sensor value compared to the one used in the above experiments. The resulting behaviour in the robot is the opposite of the above results.
Braitenberg vehicle 2
Goal
To make vehicle 2a and 2b as pictured in Figure 1 and run them with both inhibitory and exitatory connections.
Plan
We will mount two light sensors on the vehicle and map motorpower to the wheels. This will be done in two ways as the figures (2a and 2b) in Figure 1 show, which means we will try with the sensor value being mapped to power on the wheel placed diagonally across or to the wheel on the same side as the sensor.
Results
Running the robot with the sensors controlling either the wheel diagonally across from them or the wheel on their side results in two behaviours: If they control the wheel diagonally across the behaviour of the robot is that it moves towards light and if the sensors control the wheel on their own side, the robot moves away from light.
Braitenberg vehicle 3
Goal
Build vehicle 3 which is pictured in Figure 2. The vehicle should be able to move between a light source and a sound source using its different sensors.
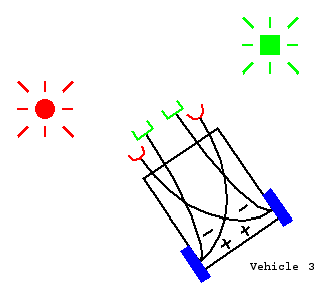
Figure 2
Plan
To detect the light source and sound source we will use sound and light sensors.
Results
We haven’t made the code for the robot yet, so it’s going to subject for another blog post soon.
References
[1]Tom Dean, Introduction to Machina Speculatrix and Braitenberg Vehicles
[2]Tom Dean, Notes on construction of Braitenberg’s Vehicles, Chapter 1-5 of Braitenbergs book